In Part 1, the focus was all about chipping and fading. In Part 2, things will shift to dirt and grime and oil and grease. Let’s get filthy!
Washes, Filters and Stains, Oh My!
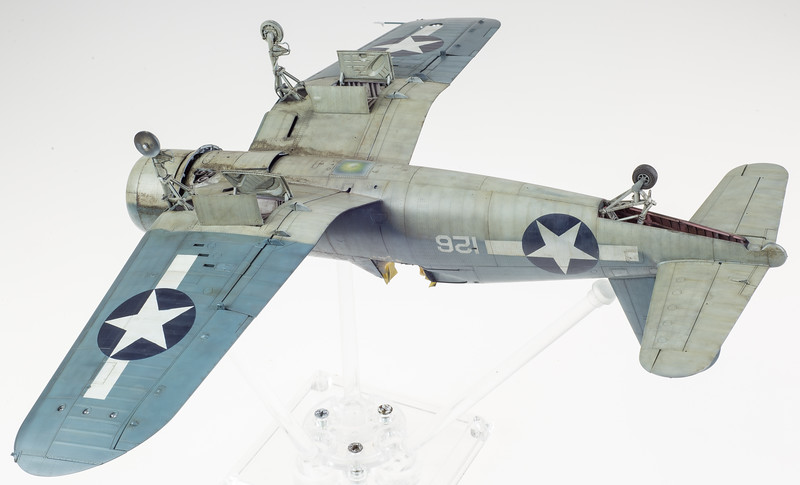
The Corsair was so prone to leaking fluids that one half expects to find a Land Rover badge hidden on it somewhere. Those leaks, combined with the harsh operating environments of South Pacific island airfields, created some of the war’s filthiest aircraft.
Eventually, the crews managed to cut down on the worst leaks by laying down tracks of tape around the main fuel fill and surrounding panel joints. This is what those weird white lines you see ahead of many Corsairs’ windscreens are all about.
The thing is, this trick wasn’t discovered off the bat, and many Birdcages flew without the taped-up panels.
And that meant OMGF stains.
For a while, I was at a loss as far as how to actually represent this. The timely opportunity to build a Bf 109G-10 for The Weathering Magazine gave me a good excuse to procrastinate and mentally chew through the problem.
Ultimately, I opted to use a Dark Brown wash from Mig Jimenez’s new AMMO line. This is an enamel wash, intended for armor and a bit too intense for most aircraft applications. But well-suited to the kind of staining I was after. Thinning the wash about 1:1 with AMMO thinner, I stippled it on with a small brush. As with the salt, the goal was a randomized, diffused pattern – at first.

This was further supplemented by additional, heavier applications around major panel joins, the idea being that the grime would accumulate where it could gain purchase (and where stuff leaked out).

Fresher fuel stains were also added around the main fuel fill forward of the windscreen. These were done with AMMO Fresh Fuel Stains applied carefully with a small-diameter brush, then refined using a flat brush dampened with thinner as a “blade” to shape the streaking stains. An overall brown filter from Mig Productions was also applied to the rest of the airframe to carry some very subtle dirtying beyond the cowl and forward fuselage.


Panels and Rivets
By this point, the Corsair is really coming along, but it needs just a little something more. All that lovely surface detail Tamiya has provided needs to be shown off a bit more, to create an even more war-weary aircraft.
Enter AMMO Panel Line Washes.
I’ve used various products for picking out panel lines and rivets in the past – from oils to Flory clay-based washes. In my opinion, AMMO beats them all, for two reasons.
First, there are a ton of shades to choose from, and they’re far more sublime than the usual “dark brown” or “dark gray” or “black”. We’re talking Tan Gray, Blue Dirt, Orange Brown. Shades that complement the paint scheme rather than taking it over.
Second, the fact that you can apply these washes, and then just wipe them off. There’s no need to dampen anything with thinner or water. Just…wipe the excess away. I don’t know how it works, but it does, and it’s glorious. It means a lot less lint cleanup on the back end.
Starting with the underside, I used Deep Gray on the cowl and dirtier portions of the forward fuselage, then Tan Gray over the Light Gray, and Blue Dirt over the Blue Gray.


And after the wipe-off, here are the results:

The upper surfaces received a similar treatment, with Blue Dirt serving for most of the surface, and Deep Gray providing a slightly richer impression on the cowl and forward fuselage.

After the panel wash was applied and the excess removed as per usual, the Corsair got a few light coats of Vallejo Matt Varnish. It does a better job of taking the paint flat than most other options I’ve tried, and does so (at least for me) without the dreaded “frosting” that can occur with other flat clears.

At this point, it’s looking pretty good. Still some minor things to attend to – the various lenses and lights, the aerial rigging…and pigments.
Pigments
Typically, pigments aren’t my favorite thing. They’re temperamental, messy, and all the browns always look way too red-brown to me. But man are they great at one thing – particulate effects. Dust. Exhaust stains. And that’s exactly what I needed them for on the Corsair.
The gun staining on “Tojo Eats Shit” is pretty pronounced on the underside of the wing, extending what looks like all the way back, and at least to the flaps, thanks to the shell ejection ports. This was represented with simple black pigment, lightly sprinkled on and then “swiped” back. I took some pains to avoid it looking too streaky by coming in with some horizontal strokes, some stippling with a larger, soft brush, and so on.

The tires were handled in a not-dissimilar fashion, with AMMO Airfield Dust being the pigment of choice. I took a light hand since the reference pic didn’t scream crazy weathering on the tires. Rather, just enough to give the impression of tires that see plenty of PSP and crushed coral.

The exhaust staining was a bit more challenging. Exhaust stains on US aircraft could be reasonably complicated depending on the aircraft, engine involved, operating conditions and so on. The dark, blackish exhaust stains aren’t really a thing so much as grayish browns and even very light tans.
On the Corsair, I started on the exhaust work back in the oil filtering phase by leaving some heavier oils in the path of the exhausts. This was followed up at the end of the build with some airbrush work of some tan-gray with some deeper browns, and this was followed with a succession of pigments, working from the lightest – Airfield Dust – through European Earth (or Dark Mud…some brown), Russian Earth, Burnt Steel Blue, and finally Black near and in the exhaust tips.
Similar – and moreso – to the gunstains, I tried to avoid “streaking” with the exhaust stains and employed large, soft brushes where I needed to eliminate obvious stroke marks. I also worked perpendicular to the direction of the exhaust, finding counterintuitive, but really pretty effective. Next time you’re tackling exhaust stains, give it a shot!

With the exhaust work, the weathering on the Corsair came to an end. Some odds and ends remained, but they’re largely boring things like painting positioning lights and so on. So I won’t bore you with them.
Hopefully you found something of use in this and the previous post on weathering Tamiya’s phenomenal Corsair.
If you want to see how the thing came out in the end, by all means head to the completed Build Page.
Filed under: Uncategorized


 Today’s model kits are too complicated for kids.
 The Hobby is Alright


 When I came back to modeling in 2010, I initially had a lot of questions about glue. After all, my last experience had been building models as a kid, and the glue situation was pretty much as follows: